When children expand their musical horizons with Mussila, we notice that many become curious about transitioning from phone or tablet to piano and keyboard. And the first challenge they face is how to position hands on a piano. We also know that lots of parents might want to buy an instrument to help their child’s progress. Some parents even have a spare piano lying around to support their child’s learning. But here’s the most important question: how do you help your child make that switch, and where do their fingers go?
Regardless of piano or keyboard, when their children switch from digital to analog, from a handheld device to the real deal of 52 white, long keys and 36 black, short keys, lots of parents ask: where do your child’s hands go? And an excellent question it is! So whether you have some musical background, a lot, or none, here’s our guide to hand positioning on a piano. Don’t forget that they can still “go electric” with Mussila once they get comfortable with their acoustic transition.
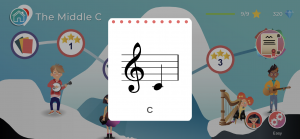
Tip #1: When Hand Positioning On Piano The Middle C Is Your Friend
The Middle C is the center of your child’s musical education and understanding. It’s their “home base,” their north star. It’s also the note that links the two clefs (treble and bass) on the grand staff. You can see it below:
Tip #2: Where To Place Your Right Hand on Piano
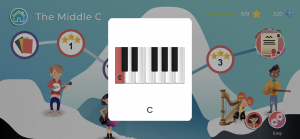
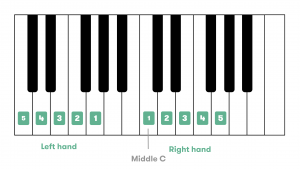
To find the Middle C on piano or keyboard, look at the diagram below. You’ll see that the black keys are grouped in twos and threes. Next, concentrate on the black keys grouped in twos. The Middle C is on the left of two black keys in the middle of your instrument’s keyboard. On some pianos, you’ll find the piano maker’s brand or marque above the Middle C.
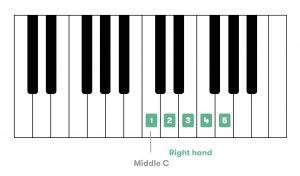
Think of the Middle C and the four white keys to its right as numbered 1, 2, 3, 4, and 5. These white keys and their numbers correspond to your thumb (1), index finger (2), middle finger (3), ring finger (4), and pinky (5)! You can see the diagram below showing where the fingers on the right hand go.
This hand positioning works for many simple songs, but not all.
Tip #3: Where To Place Your Left Hand on Piano
Depending on what song your child is learning, left-hand positioning can vary. Try out these two left-hand positions for beginners. Yes, both thumbs are on the Middle C with the first diagram (1)! The second diagram (2) has the pinky positioned on C an octave away with the thumb resting on G. When your child is ready to incorporate both hands while playing, we recommend seeking a piano teacher for advice.
(1)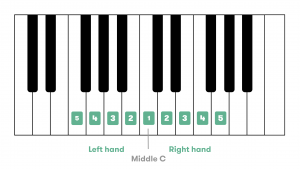
(2) 
Tip #4: Teach Your Child To Relax Their Hands
Practicing hand positioning on piano can literally be a stretch for smaller hands; that’s why it’s essential to relax. When your child approaches the keyboard at ease and relaxed, it helps them develop a more effective technique and prevent stress and injury. If needed, encourage your child to shake out any stress they may be feeling in their fingers, hands, and arms. Try lifting your arms and let them fall freely, feeling the natural weight of your arms.
[convertful id=”132642″]
Tip #5: So, You Know Where To Position Your Hands, But How Do You Hold Them?
Think of a T. Rex. Bend your arms at your elbows and encourage your child to do the same. Next, let your hands hang in front of you with your palms down. See?

After this, imagine the T. Rex is holding a small ball in the palm of its claws. Try it yourself. You’ll see that your thumb and index finger on each hand make the letter “C.” Next, sit at a table and let your curved fingers fall on the tabletop. Do you feel the bounce in your fingers and wrists? This is the positioning you’ll want your child to have when extending their hands and arms over the keys. Their fingers should be relaxed and able to move freely. For a little more in-depth explanation of hand shape and hand position, check this out.
Don’t Forget To Have Fun With Your Child Too!
We know that eighty-eight piano keys can lead to more than eighty-eight questions! So, remember that the transition from tablet or phone to piano may have some challenges along the way. And that’s ok! Because of this, one aspect of our educational methodology that we are proud of at Mussila is “Learning through play.” This is why experts around the world recommend us for music education. Do you have more questions? Or you’d like to share your tips & tricks. We’d love to hear from you. Ask us anything.